

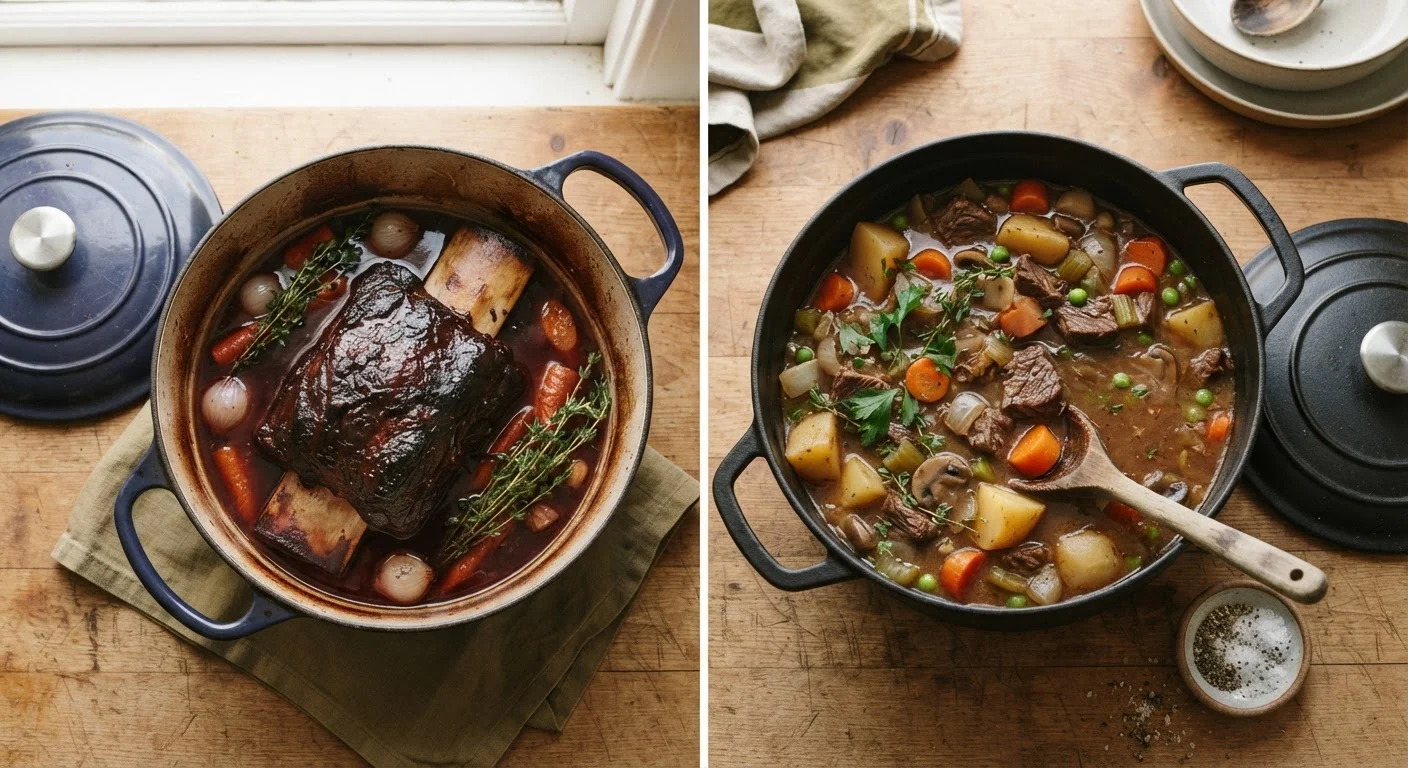
Option A
Braising
The technique for large cuts cooked in minimal liquid.
Best for: Whole roasts, bone-in cuts, and proteins you want fork-tender with a glossy, concentrated sauce.
Option B
Stewing
The technique for small pieces fully submerged and simmered through.
Best for: Bite-sized meat and vegetable combinations where every component absorbs a shared, unified broth.
The Core Distinction: Liquid Level and Cut Size
The single clearest dividing line between braising and stewing is how much liquid you use relative to the food - and what size that food is cut into.
In a braise, a large or intact piece of meat - think bone-in short rib, pork shoulder, or a whole chicken leg - sits in a pot with liquid reaching roughly one-third to halfway up the sides. The bottom half cooks in moist heat; the top half steams. This partial exposure is intentional. The result is a piece of meat with textural contrast and a concentrated, gelatinous sauce that forms as the liquid reduces during cooking.
In a stew, protein is cut into smaller uniform pieces - typically one to two inches - and the liquid covers everything completely. There's no exposed surface. Every chunk of meat and every piece of vegetable is fully submerged throughout the cook, absorbing and contributing to a shared broth.
The distinction matters practically because it affects not just flavor, but how you manage the pot. A braise doesn't need stirring; a stew benefits from occasional attention. Liquid management in a braise is a feature - you want it to reduce. In a stew, you generally maintain the liquid level.
| Criterion | Braising | Stewing |
|---|---|---|
| Cut size | Large or whole pieces | Small, uniform chunks |
| Liquid level | Partial (1/3 to 1/2 up sides) | Full submersion |
| End result | Concentrated, glossy sauce | Integrated, pourable broth |
| Typical proteins | Short ribs, pork shoulder, lamb shank | Beef chuck cubes, chicken thighs, lamb pieces |
| Liquid management | Reduce deliberately | Maintain level |
| Hands-on attention | Minimal - no stirring needed | Occasional check and stir |
| Typical oven temp | 300°F-325°F | 300°F-325°F |
What Actually Happens During Each Cook
Both methods work because of collagen. Tough cuts - the ones most suited to slow cooking - contain significant amounts of connective tissue. When held at a sustained temperature between roughly 160°F and 210°F over time, that collagen breaks down into gelatin. Gelatin is what makes a braise feel silky and a stew feel full-bodied rather than watery.
The difference is how that gelatin ends up distributed. In a braise, gelatin released from the meat dissolves into the small volume of liquid, which then concentrates as it reduces uncovered or partially covered. You end up with a sauce that coats the back of a spoon without any added thickener. In a stew, gelatin disperses into a larger volume of broth. The result is still rich, but more pourable and less intensely reduced.
Searing before either method builds flavor through the Maillard reaction - browned surfaces add complexity that simmering alone can't produce. For more on what searing actually does (and doesn't do), see our breakdown of common searing myths.
Braising and Stewing Both Reward Patience
Neither method benefits from high heat or rushing. Boiling - rather than a gentle simmer - actually toughens meat proteins instead of relaxing them, which is why temperature control matters. If your braising liquid is at a rolling boil, reduce the oven temperature or crack the lid. A few lazy bubbles every few seconds is the target, not an active simmer.
Choosing the Right Cookware and Liquid
Heavy-bottomed, oven-safe vessels - Dutch ovens being the most practical - work well for both techniques. Their mass distributes heat evenly and holds temperature steadily, which matters when you're cooking at a low simmer for one to four hours. Understanding heat retention helps explain why thin-walled pots produce inconsistent results in slow-cooking applications.
For the braising liquid itself, wine, stock, or a combination of the two are common choices. The liquid will reduce and intensify, so its quality matters - a watery, low-sodium commercial broth will produce a thinner, less complex sauce. Understanding the difference between stock and broth helps here: stock's natural gelatin content gives a braise a head start on body.
For stews, slightly more liquid is expected, and the broth can be supplemented with aromatics, tomato paste, or starchy vegetables that dissolve partially and contribute thickness. Both methods typically cook covered in the oven at 300°F to 325°F - low enough to maintain a gentle bubble without boiling, which toughens protein fibers rather than relaxing them.
160°F-210°F
Collagen-to-gelatin conversion temperature range
Food science sources consistently identify this sustained temperature window as where tough connective tissue breaks down into the gelatin responsible for tender, silky slow-cooked meat.
1-4 hours
Typical slow-cook time for both methods
Depending on cut size and starting temperature, most braises and stews reach optimal tenderness within this window at 300°F-325°F oven heat.
~30%
Liquid reduction in a typical braise
In a partially covered braise, it's common for liquid volume to reduce by roughly a quarter to a third during cooking, concentrating flavor and building sauce body.
The content on this site is provided for informational purposes only and should not be considered a substitute for professional advice. While we strive to provide accurate and up-to-date information, we make no guarantees regarding its completeness or accuracy. Always consult a qualified professional for advice specific to your circumstances before making any decisions.